


If you have an older SSH client, you may want to try displaying the contents of
~/.ssh/id_rsa.pub instead.
Run your own virtual server on Microsoft Azure
This guide describes how to run a virtual server appropriate for the Media Engineering Architecture & Deployment course on the Microsoft Azure cloud platform.
On this page
Table of contents
 Legend
Parts of this exercise are annotated with the following icons:
-
 A task you MUST perform to complete the exercise
-
 Optional step that you may perform to make sure that
everything is working correctly, or to set up additional tools that are not required but can
help you
Optional step that you may perform to make sure that
everything is working correctly, or to set up additional tools that are not required but can
help you
-
 Advanced tips on how to go further (or
challenges!)
Advanced tips on how to go further (or
challenges!)
 The end of the exercise
-
 The architecture of the software you ran or
deployed during this exercise
The architecture of the software you ran or
deployed during this exercise
-
 Troubleshooting tips: how to fix common problems you might
encounter
Troubleshooting tips: how to fix common problems you might
encounter
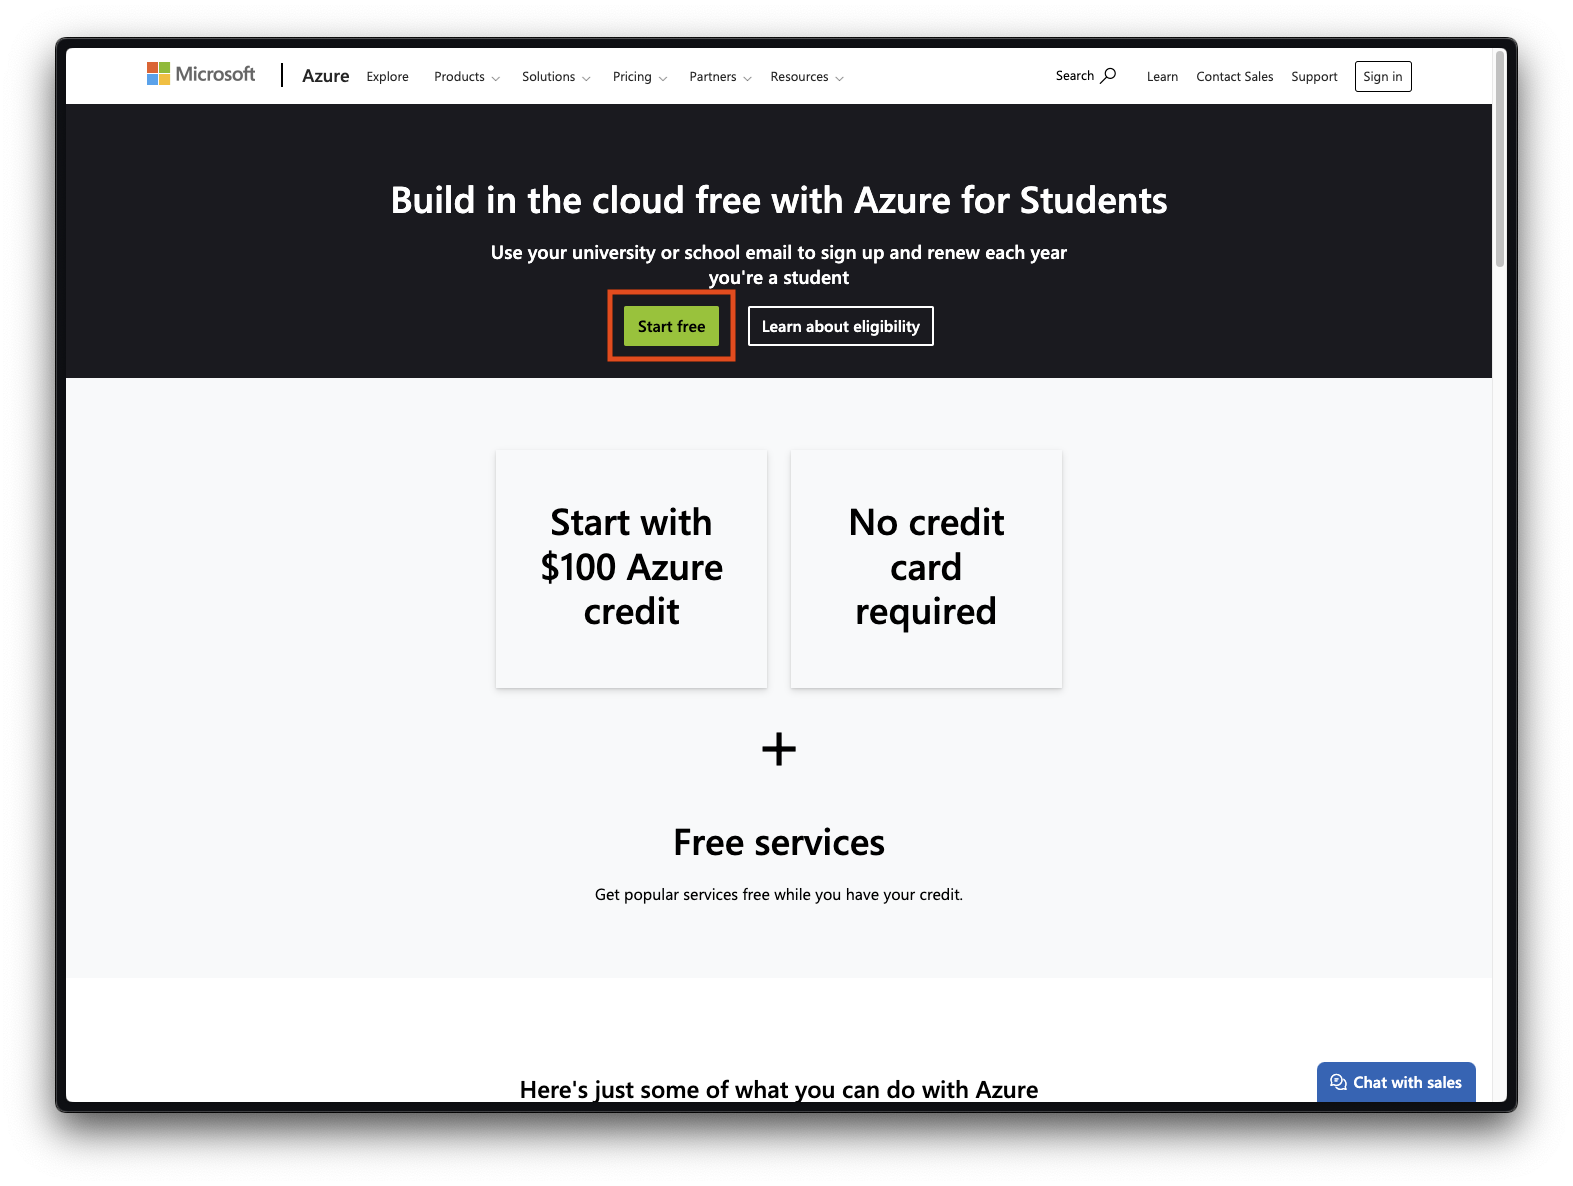
Apply to Azure for Students
Apply to Azure for Students
with your @hes-so.ch email address, which will provide you with free
Azure resources as a student.
Get your public SSH key
You can display your public SSH key in your terminal with the following command:
$> cat ~/.ssh/id_ed25519.pub
 Tip
Tip Launch a virtual server
Once you have your Azure account, you can launch the virtual server you will be using for the rest of the course.
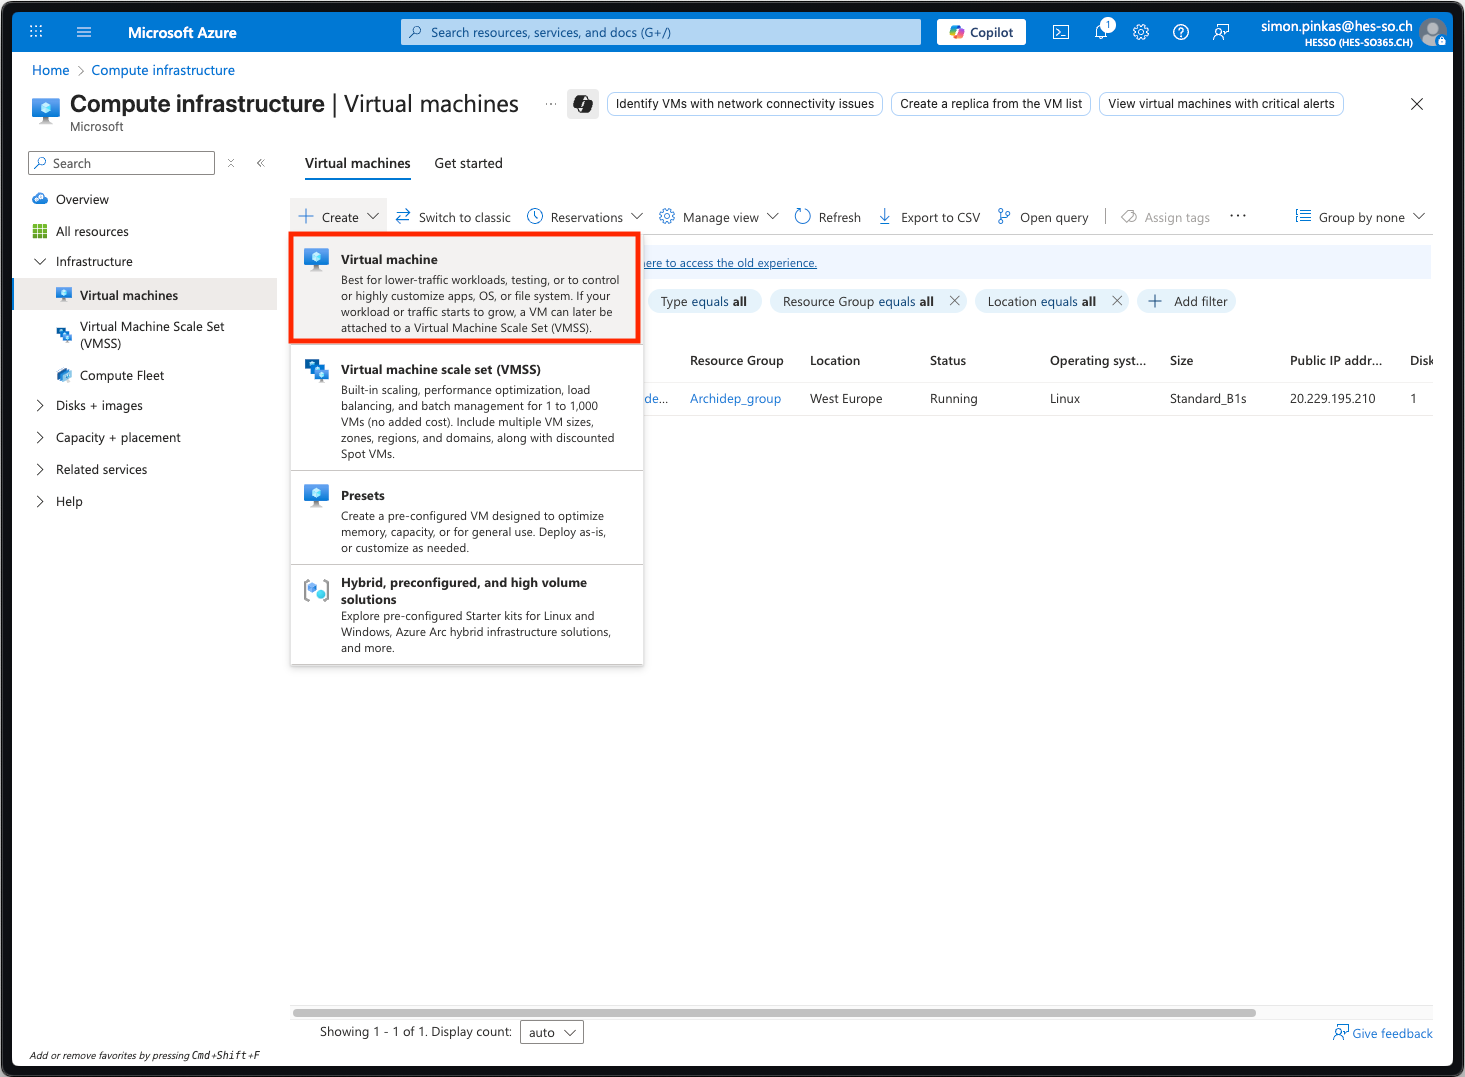
Access the Azure portal and go to the Virtual machines section:

Create a new virtual machine, i.e. a new virtual server in the Microsoft Azure infrastructure:
Configure basic settings
You will now configure your virtual machine.
Make sure to select the Ubuntu 26.04 image (x64) and the B2ats_v2 or B1s
size. If you select a VM size that is too expensive, YOU WILL RUN OUT OF
FREE CREDITS BEFORE THE END OF THE COURSE You will then have pay  for a new
VM and will have to reinstall your VM from scratch (including all deployment
exercises you may already have completed).
for a new
VM and will have to reinstall your VM from scratch (including all deployment
exercises you may already have completed).
In the Basics settings, configure the virtual machine details (the machine’s name, region, image and size):
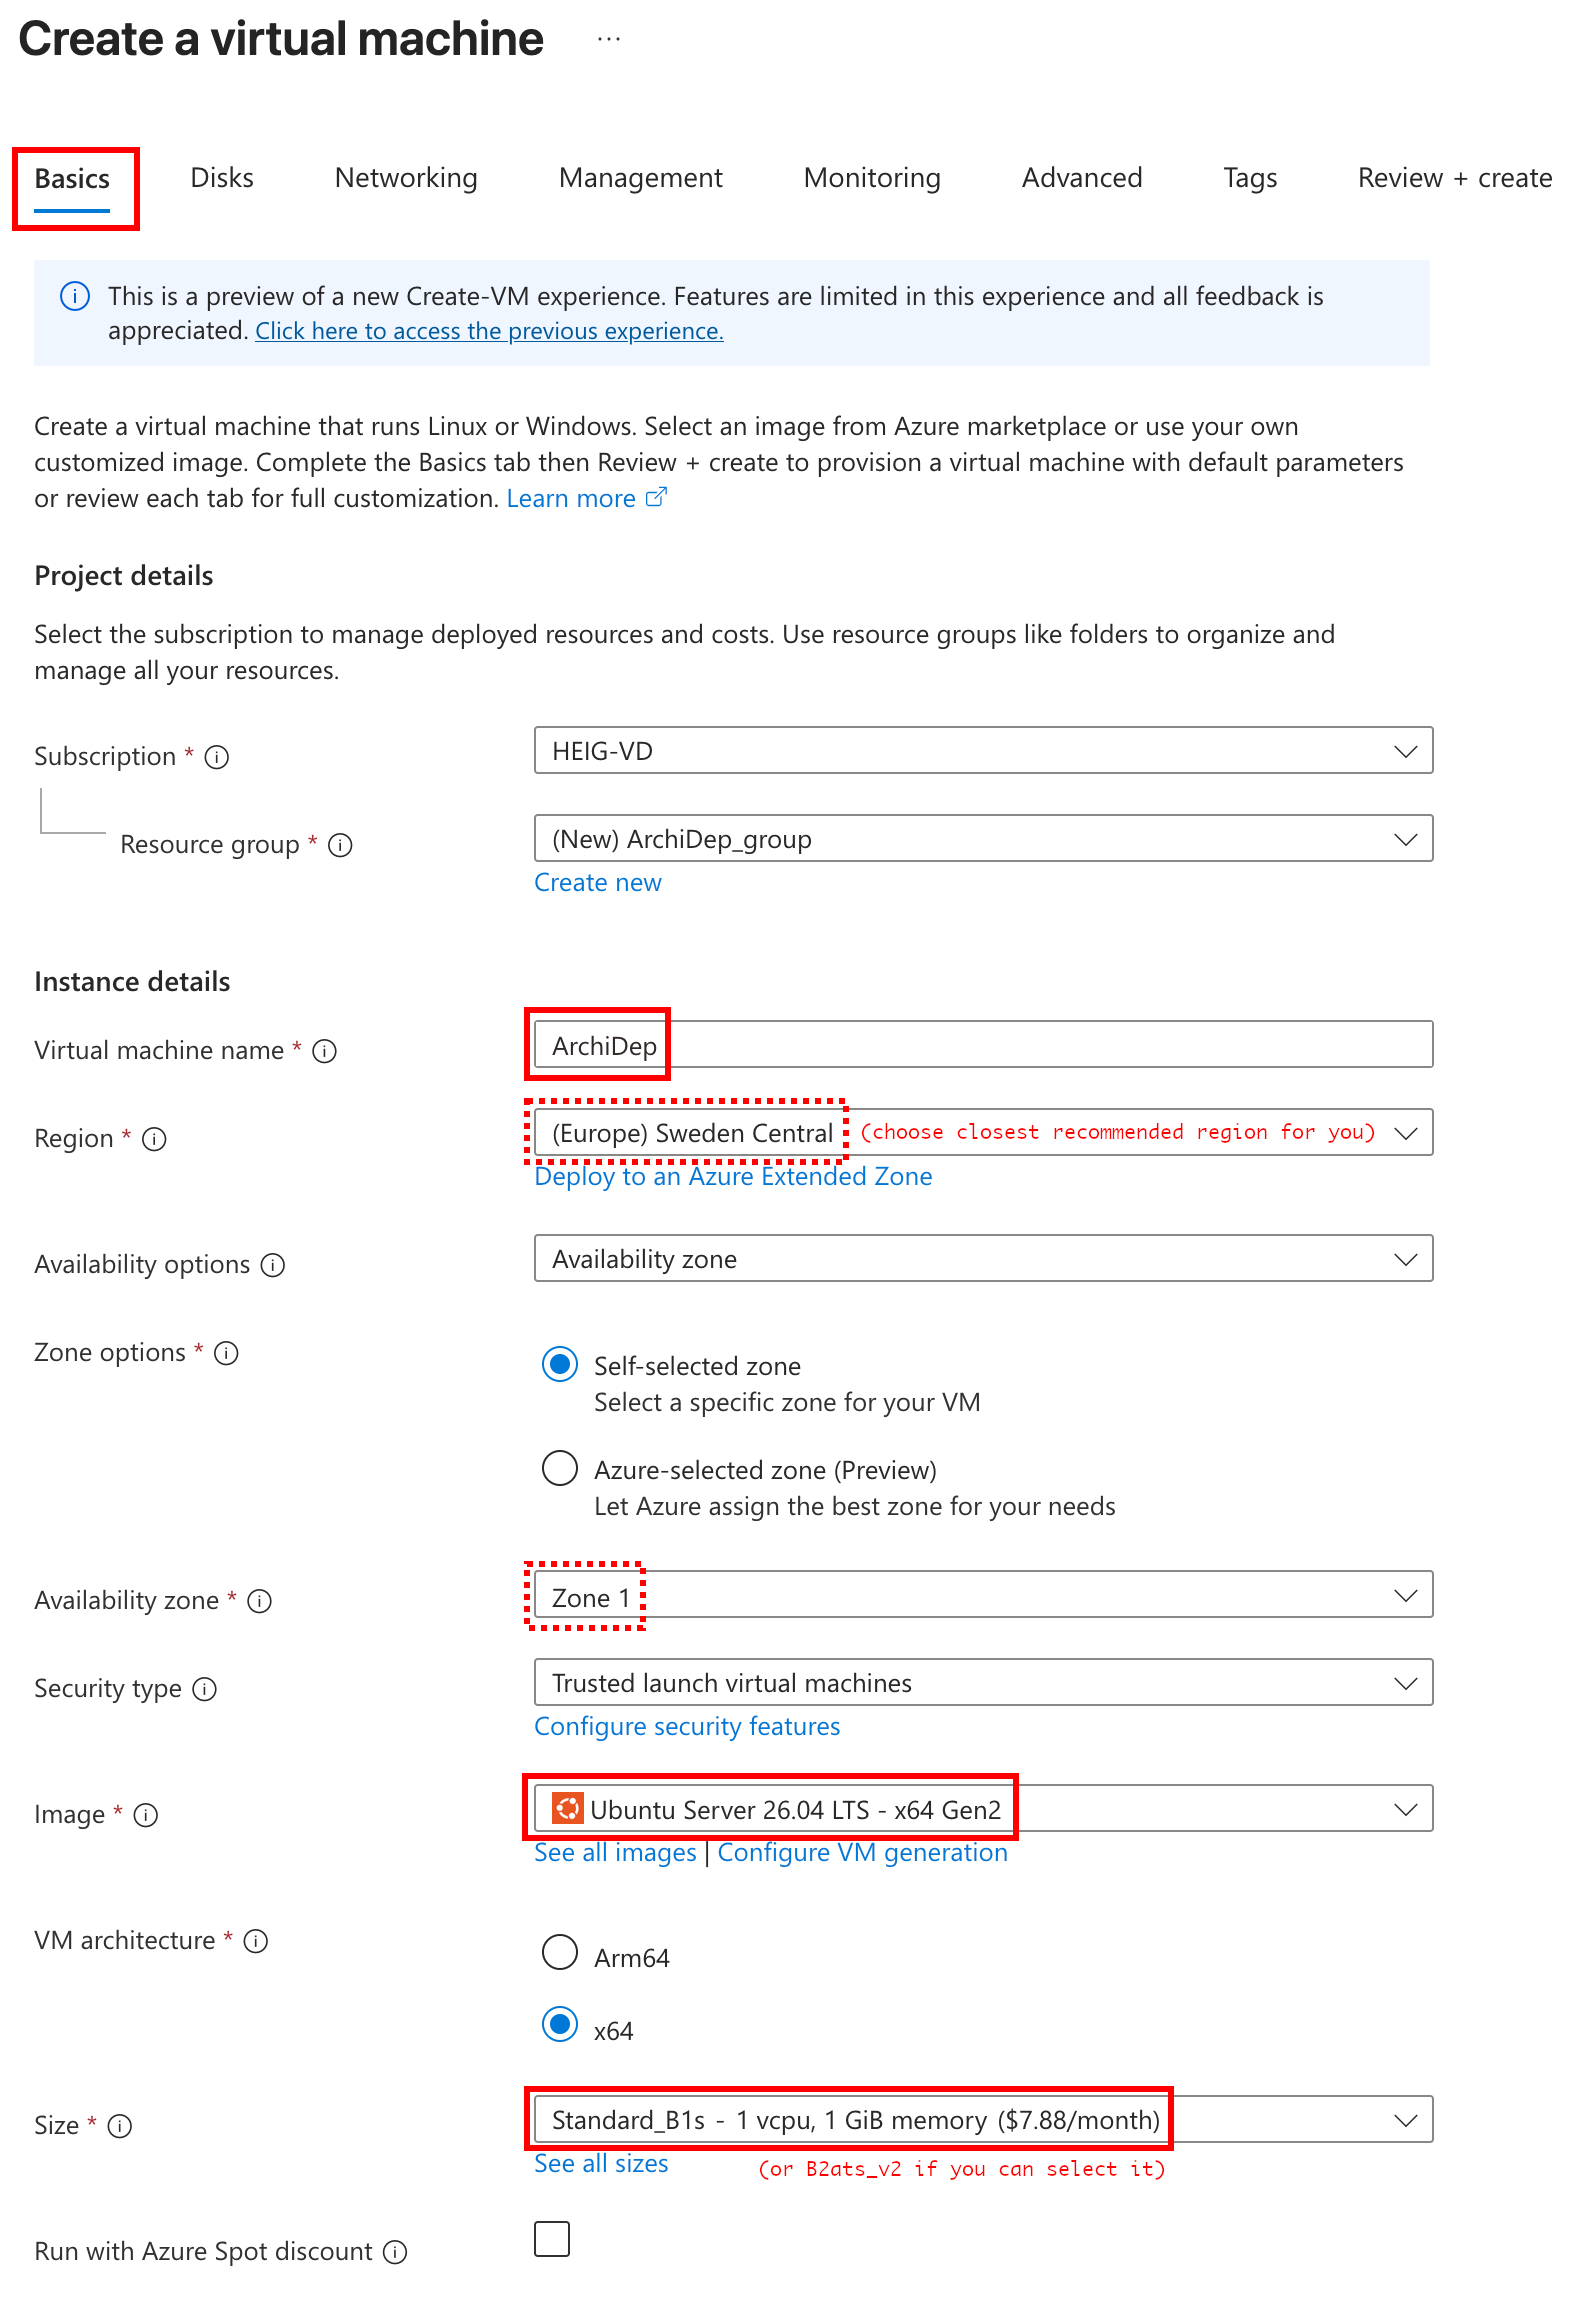
TipIf you cannot select the right size, see below for troubleshooting.
Configure your administrator account
Still in the Basics settings, just below, under the Administrator account settings, configure your username.

Replace jde with the username you have selected for the course.
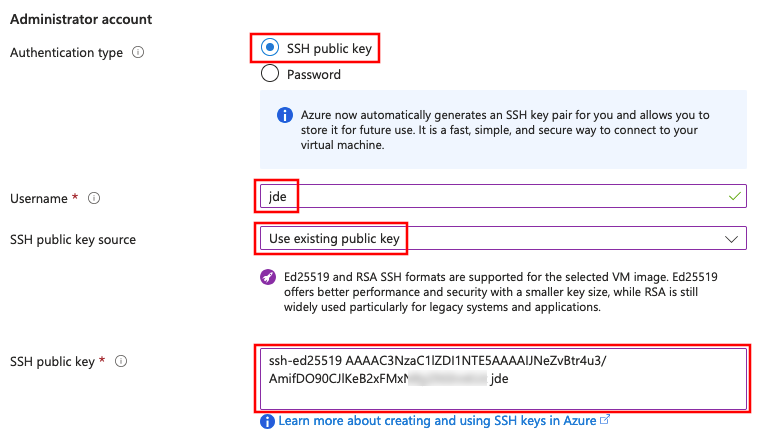
Select SSH public key authentication, set the source to Use existing public key, and paste your public SSH key (the one you copied earlier) in the text area.
Warning
Your Unix username MUST NOT contain spaces, accented characters (e.g. é), hyphens (-) or dots (.). If you use the same name later in the course as a subdomain, it MUST NOT contain any underscores (_). We suggest you choose a name that starts with a letter (a-z) and contains only alphanumeric characters (a-z and 0-9).
TipChoose a username that is simple to type because you will need to type it often. If necessary, you can change it later.
I can’t select the right size or region
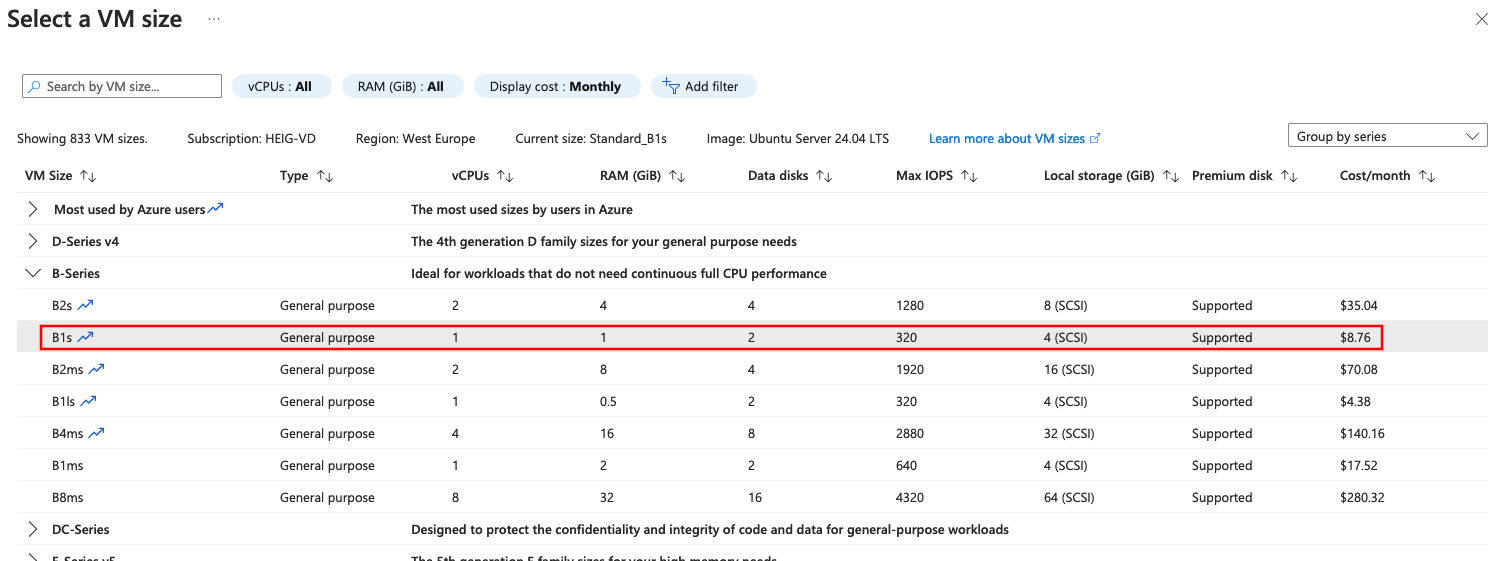
TroubleshootingIf the correct size is not selected, you can select it from the complete list of
VM sizes. If you can select neither B1s nor B2ats_v2 (for example, if they
are listed under Insufficient quota), try selecting another availability
zone, or another of the regions you are allowed to use.
TipAs a student, you are not allowed to run your virtual machine in any region. Azure only allows each student a handful of regions, and they are different for each student. Choose one of the regions listed as Recommended for you; those listed as Ineligible will not work:
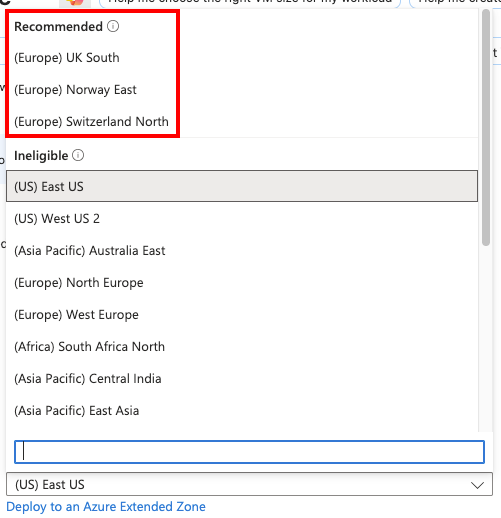
Among your allowed regions, choosing one closer to where you are (or where your customers are) will reduce latency. Prices vary slightly between regions: the cost review below will tell you if your choice is too expensive.
Make sure the SSH port is open
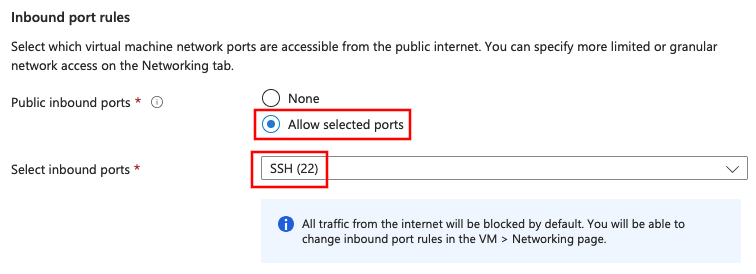
Under inbound port rules, make sure the SSH (22) port is allowed:
Next, go to the Disks settings (DO NOT create the machine just yet):

Skip the disk settings
Keep the default Disks settings and go to the Networking settings:

Configure open ports
In the Networking settings, select the Advanced security group option, and create a new security group:
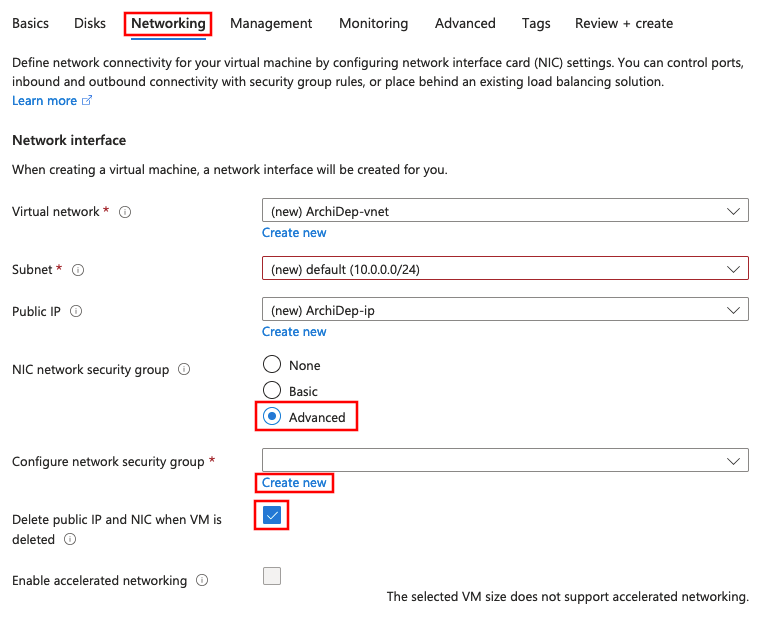
Add two inbound rules, one for HTTP and one for HTTPS:
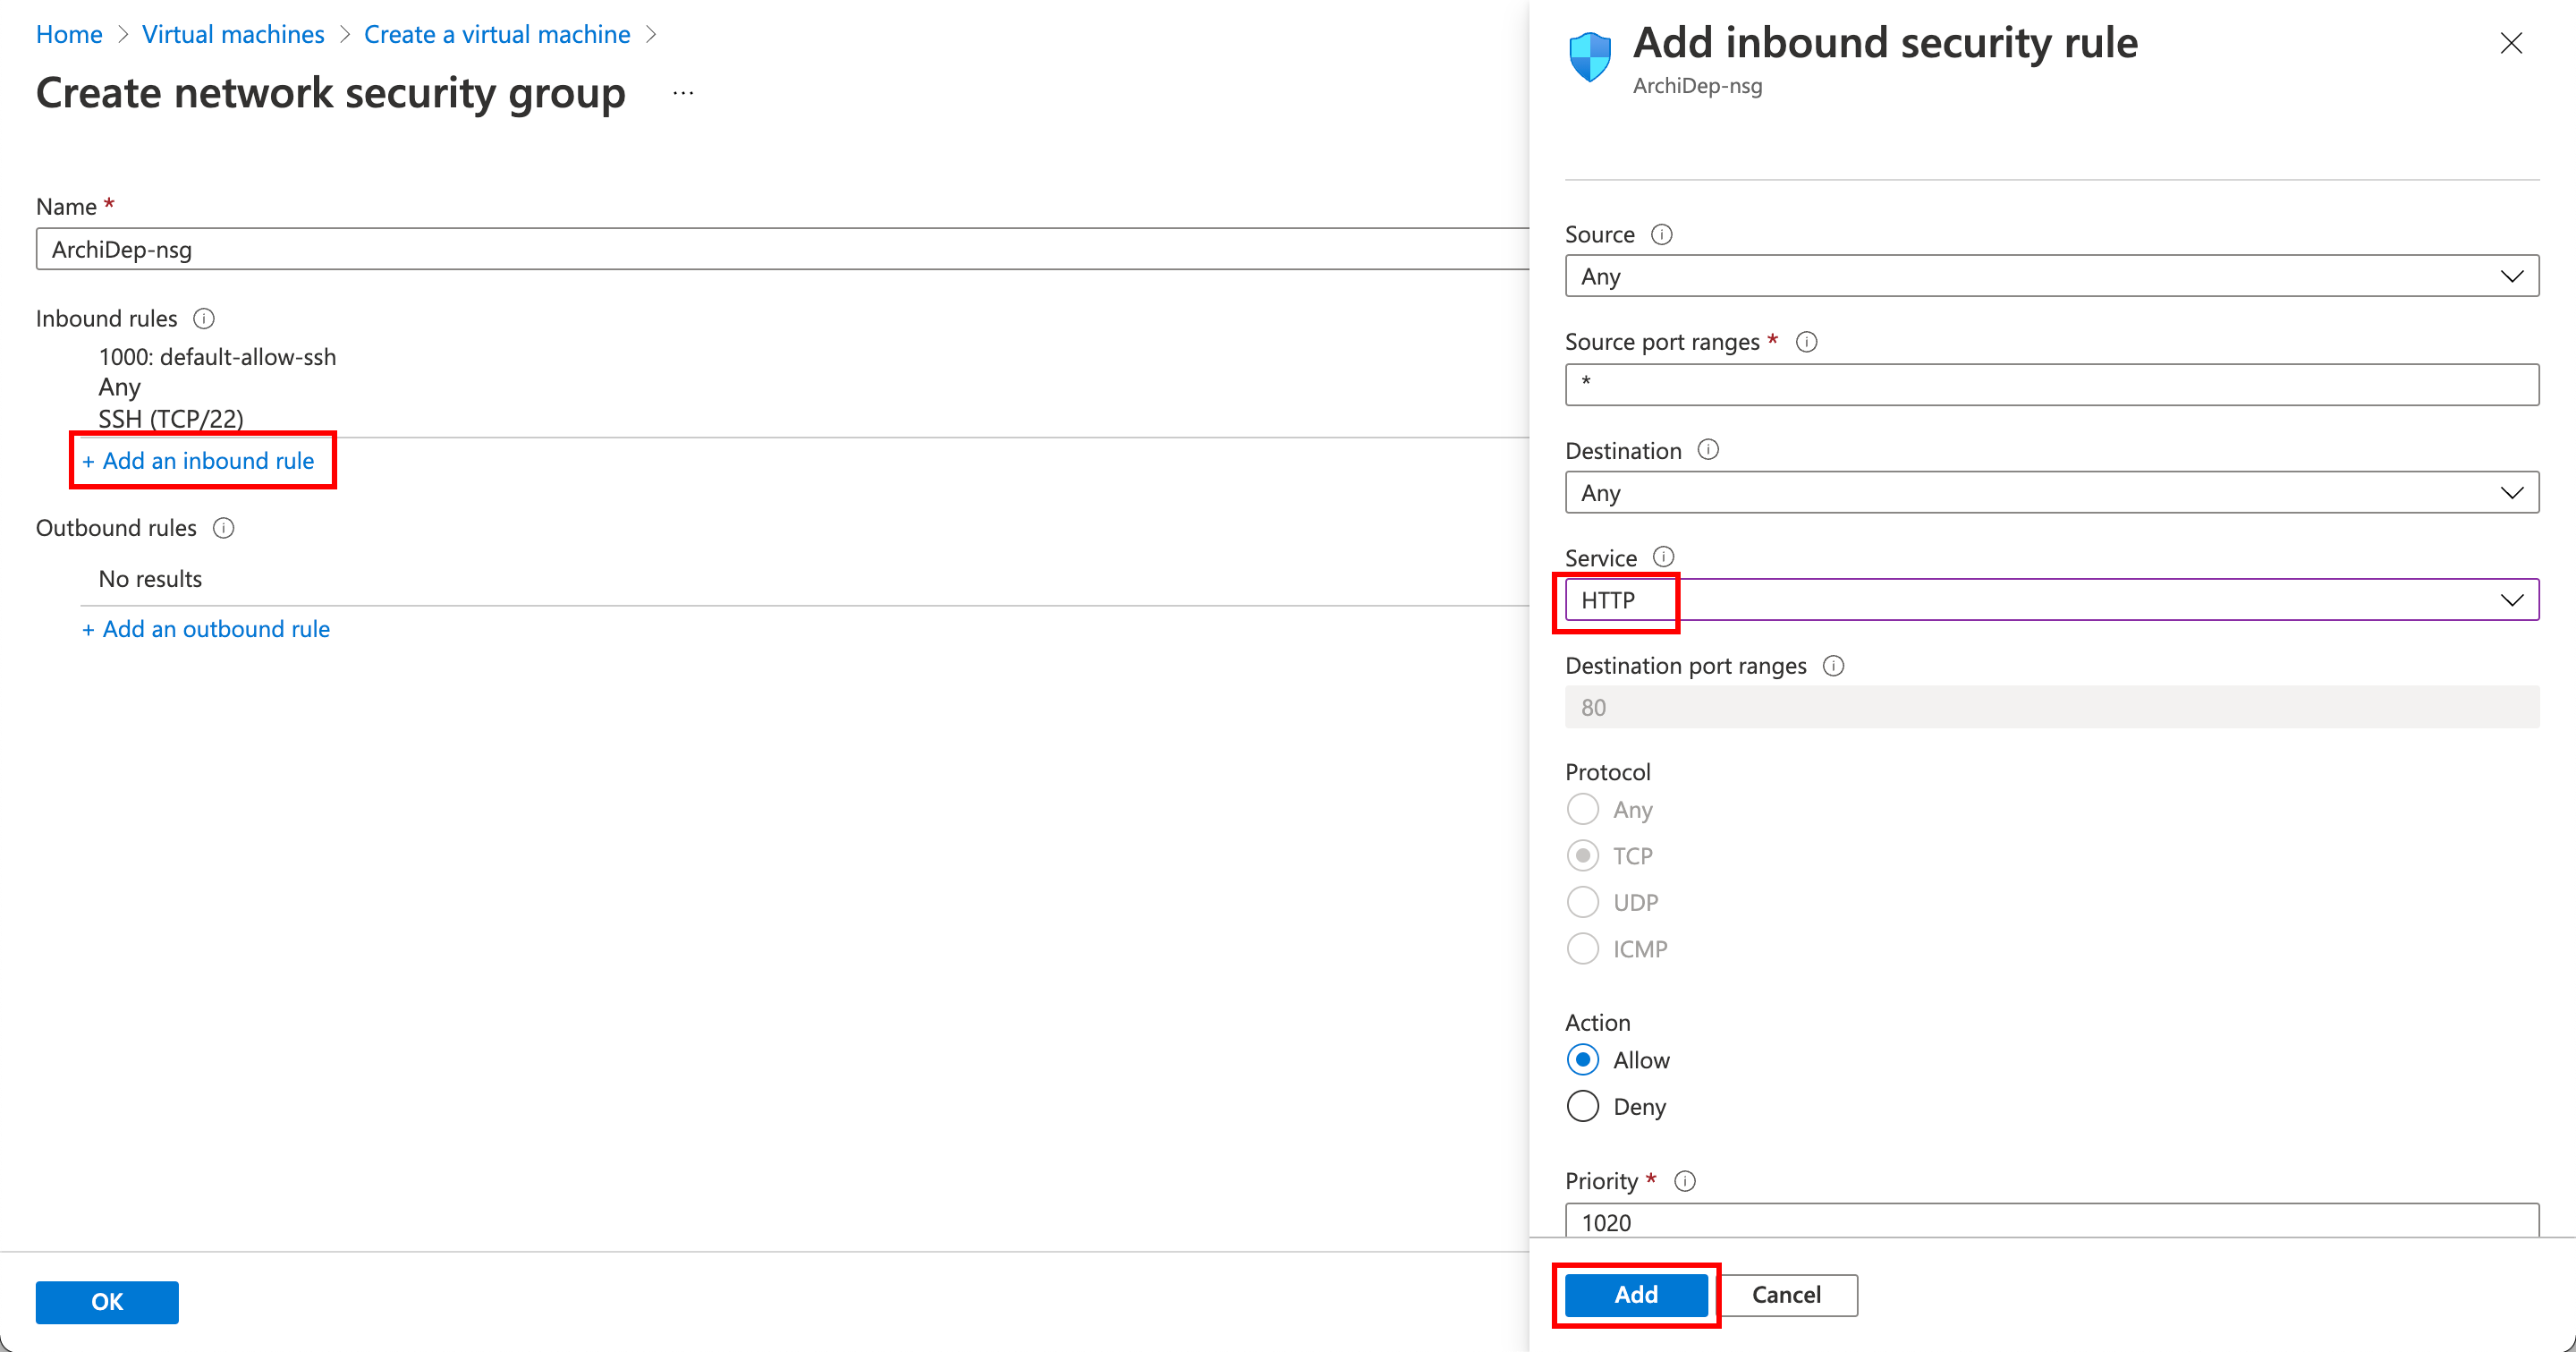
TipYou will also have to name them. You can simply name them “HTTP” and “HTTPS”.
Add two other inbound rules, one for port 3000 and one for port 3001:
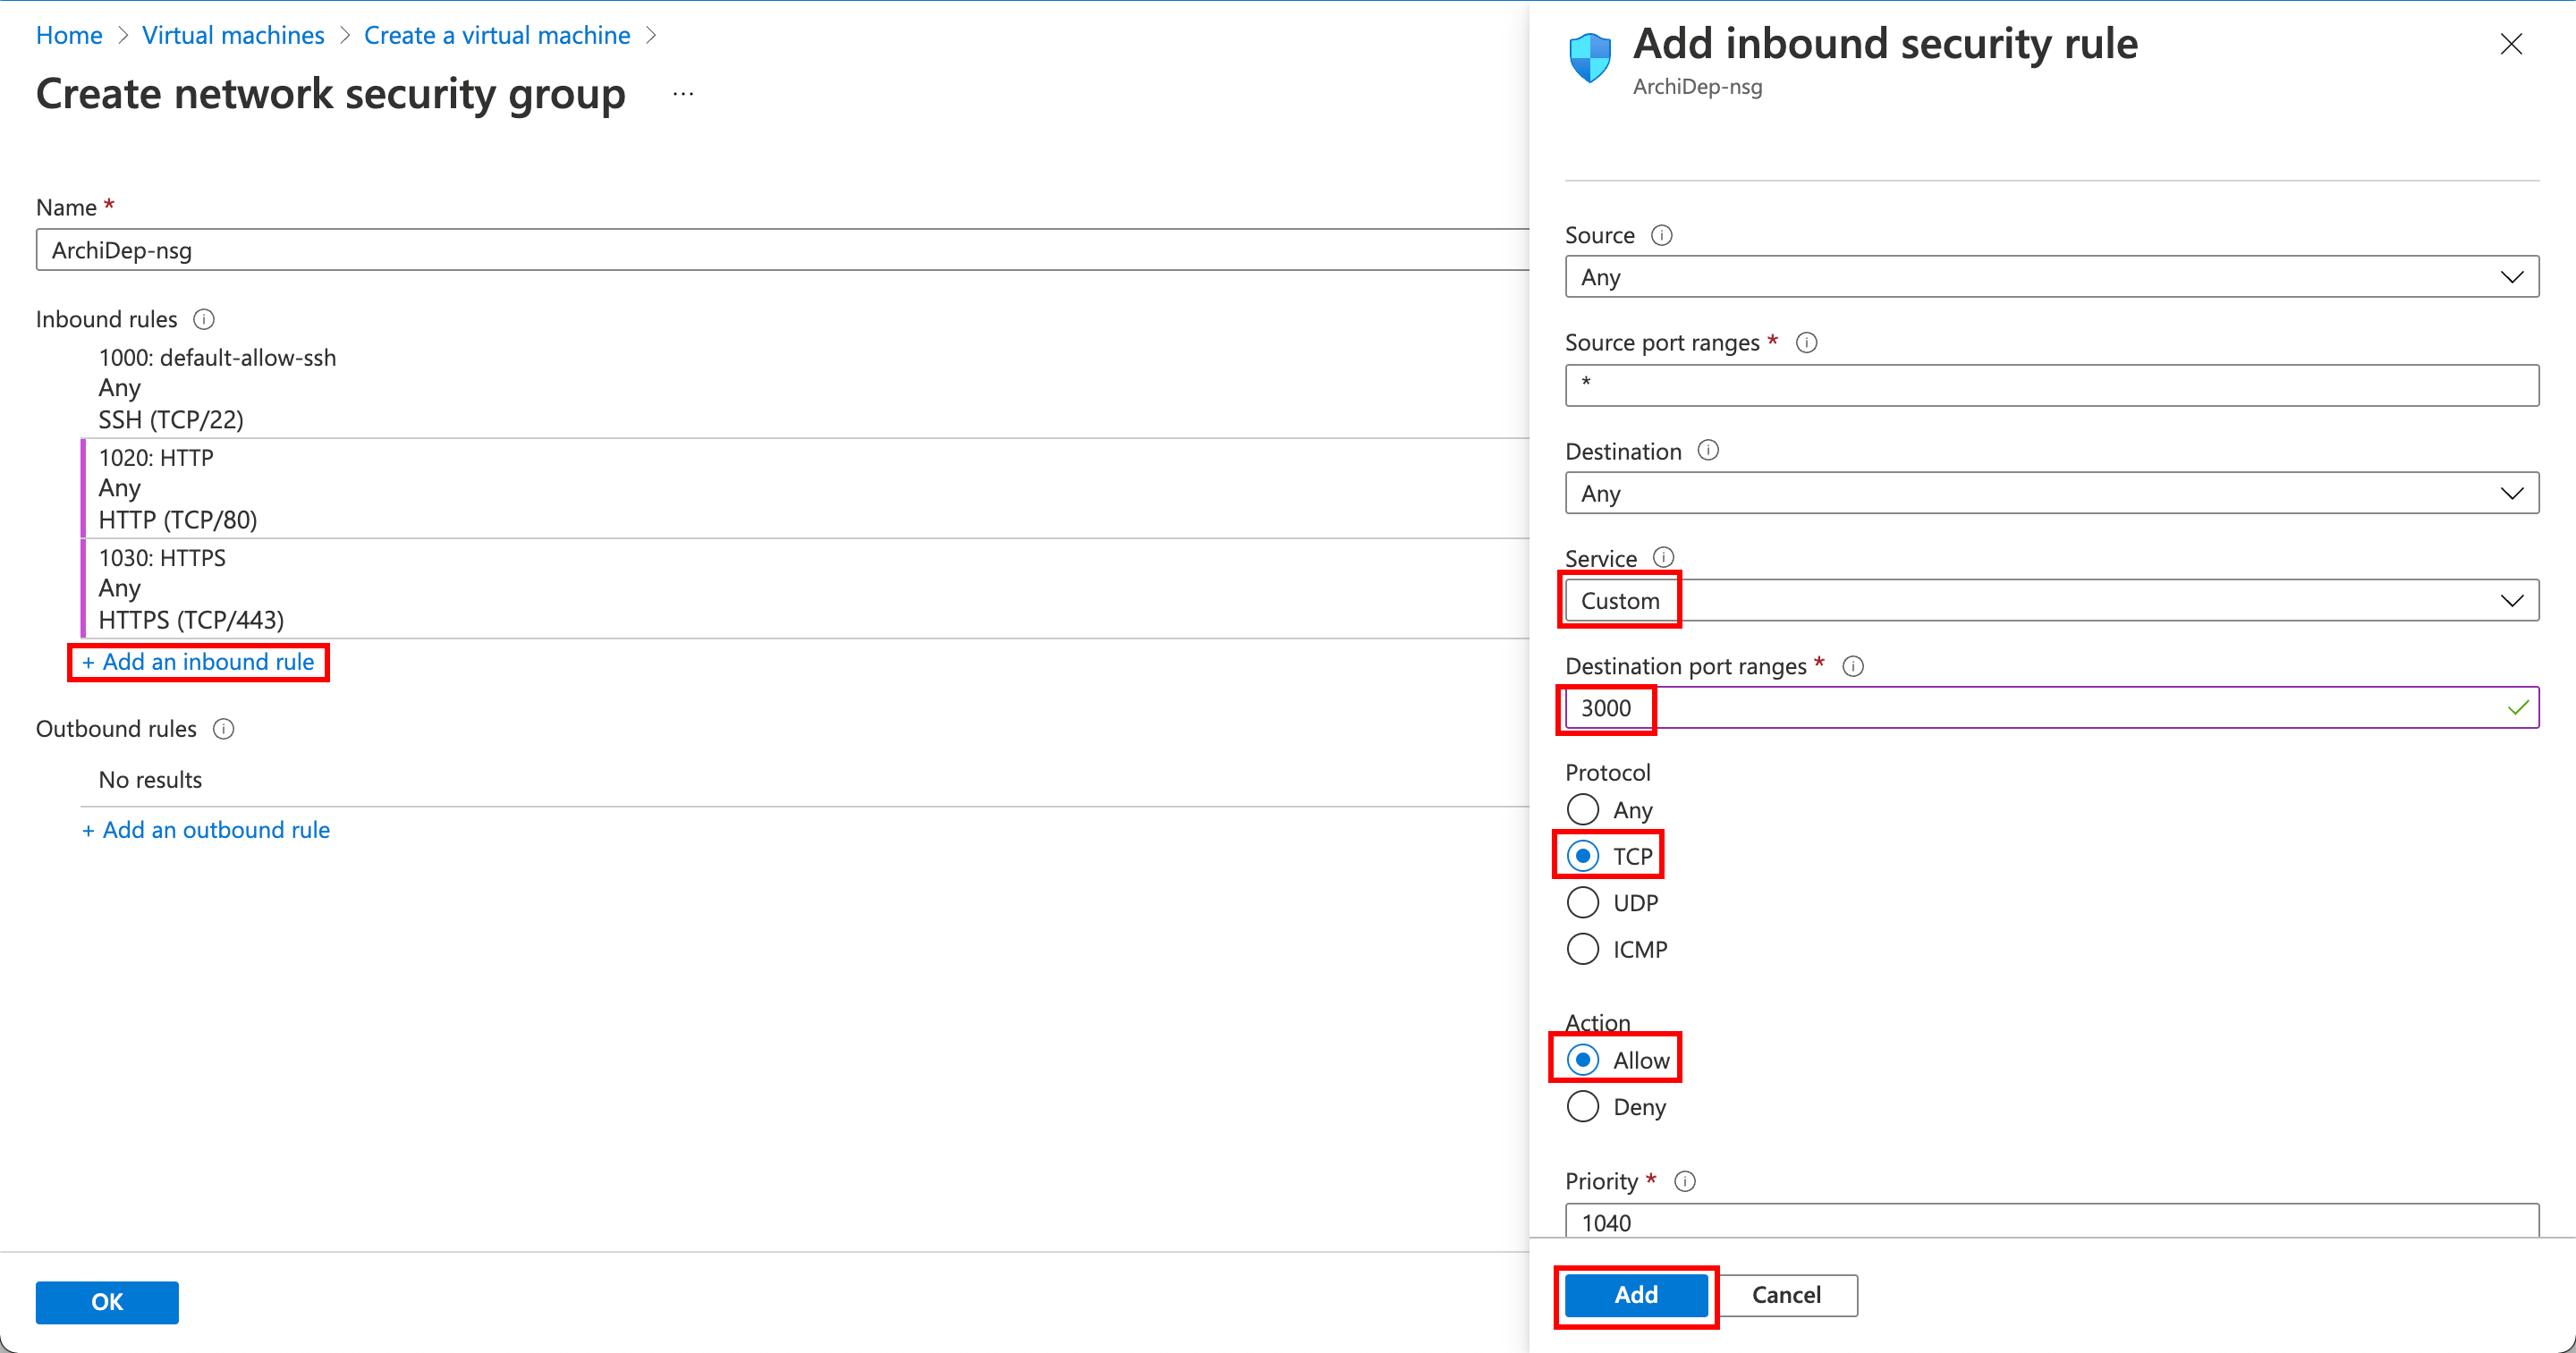
TipYou can simply name those rules “Port3000” and “Port3001”.
The final security group settings should look something like this:
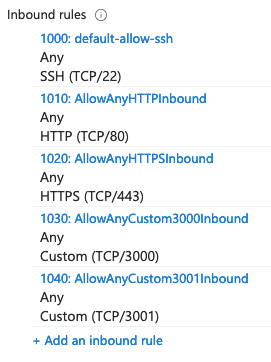

What you are doing here is configuring the Azure firewall to allow incoming traffic to your virtual server on specific ports. If you do not do this, it will not be reachable from outside the Azure network.
For example, for a web application running on your virtual server to be reachable, ports 80 (HTTP) and 443 (HTTPS) must accept incoming requests. Port 22 is for SSH connections. Ports 3000 and 3001 will be used in various exercises.
Skip advanced settings
Keep the default Management, Monitoring, Advanced and Tags settings.
Review your monthly cost
Review your estimated monthly cost:
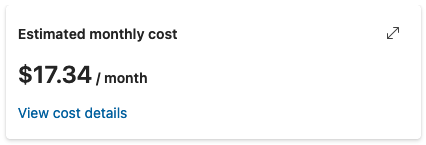
You might not see the estimated monthly cost, but you should always see the hourly cost:
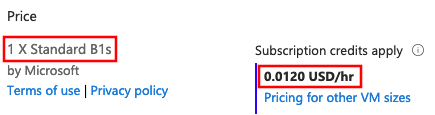
Your estimated monthly cost MUST BE UNDER $20/month OR UNDER $0.025/hour. If it is higher, you have probably selected the wrong region, or a VM size that is not the recommended one and that is too expensive for the credits you have at your disposal for this course.
Create your server
Double-check that you are launching one virtual machine of size B2ats_v2 or
B1s.
 Create your virtual machine!
TroubleshootingIf Azure tells you that you cannot create a virtual machine in the region you have selected (some regions, like West Europe, may not accept new customers even if they are allowed), go back to the basic settings and find a region that works. Make sure to re-check your estimated monthly cost afterwards.
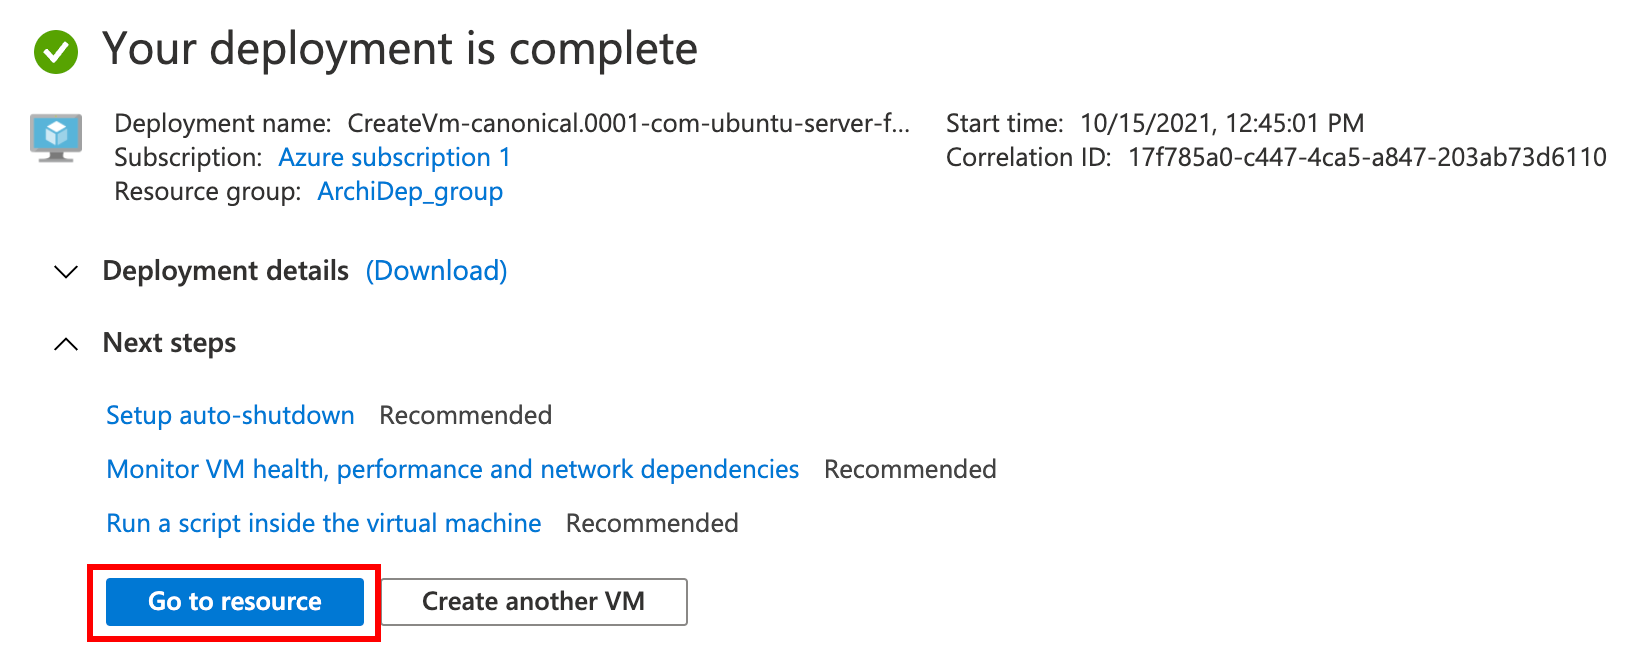
Once your deployment is complete, go to the virtual machine source:
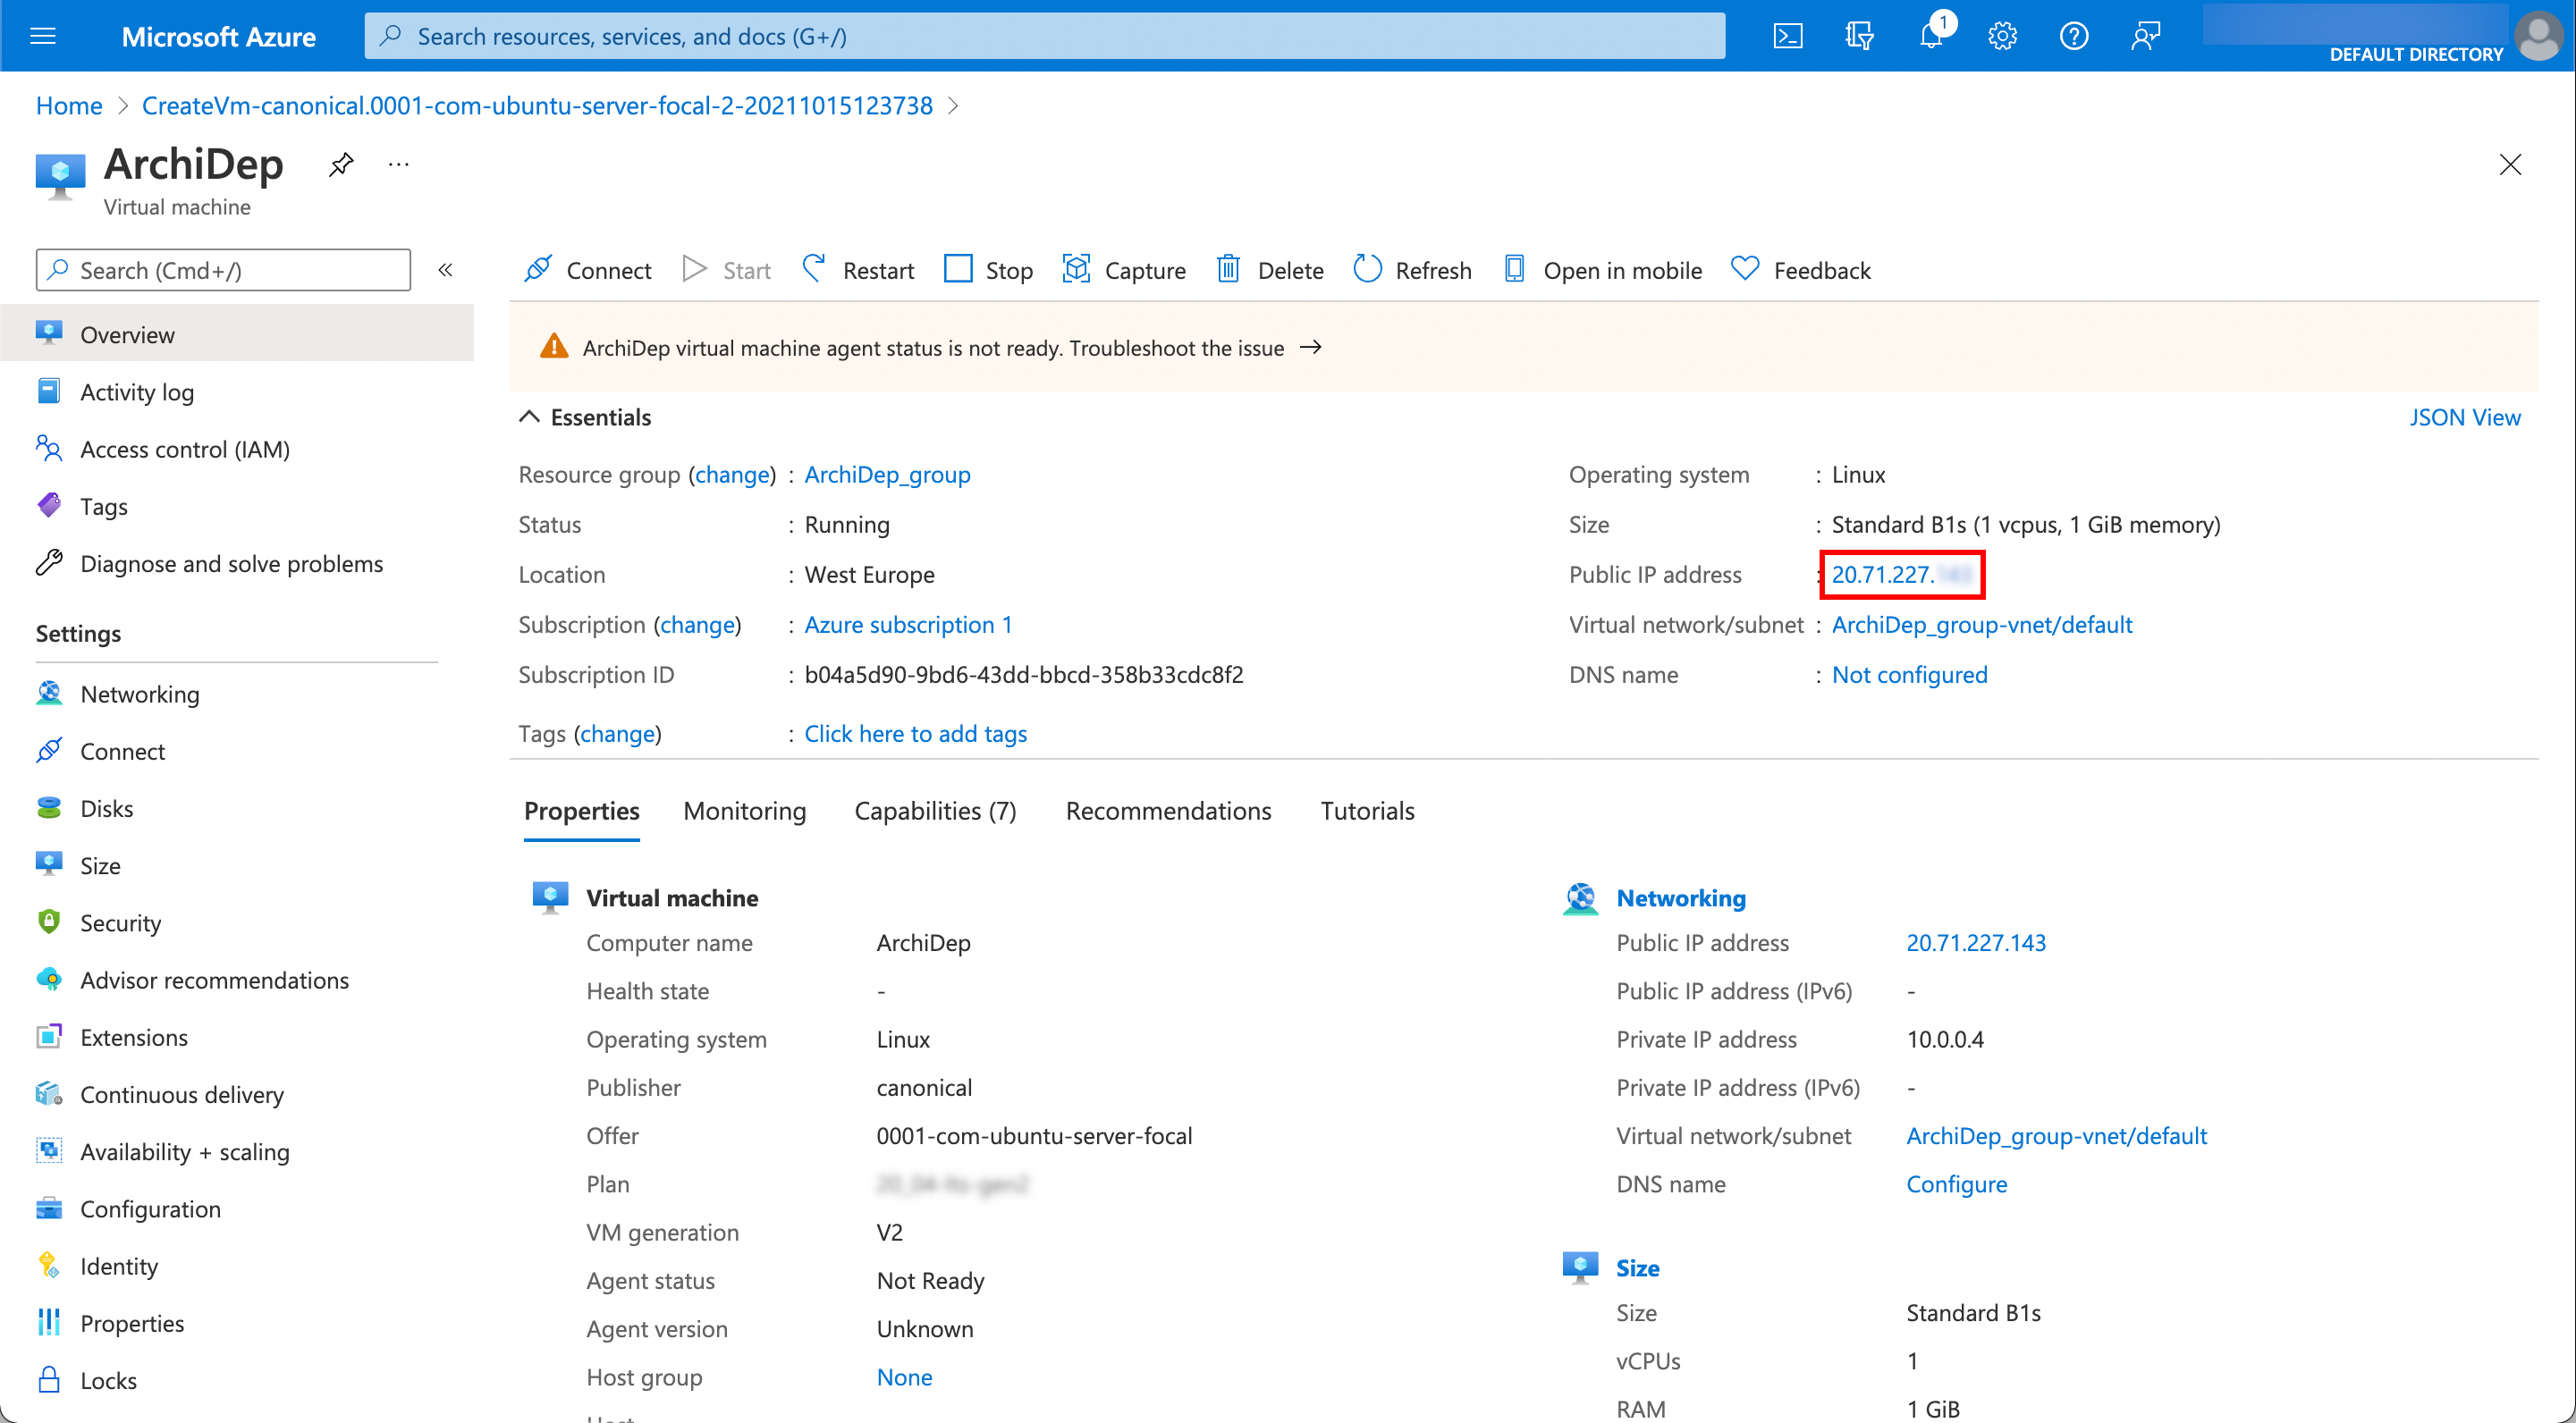
Find your machine’s public IP address in the virtual machine’s information:
(Optionally) get your machine’s public SSH key
When you connect to your virtual machine over SSH for the first time, you will get the usual warning that its authenticity cannot be verified:
The authenticity of host '20.71.227.143 (20.71.227.143)' can't be established.
ECDSA key fingerprint is SHA256:0TORCgUgzrPGeDHzV5fGAarkpGpc5Nbkhb7q2dbG0OA.
Are you sure you want to continue connecting (yes/no/[fingerprint])?
To protect yourself from man-in-the-middle attacks, you can obtain the SSH host key fingerprints from your virtual machine before attempting to connect. That way, you will be able to check whether the key fingerprint in the warning is one of your virtual machine’s keys.
To do this, you need to install the Azure CLI. Once you have it installed and have logged in, you can run the following command (adapt the resource group and name options to your configuration if necessary):
$> az vm run-command invoke \
     --resource-group ArchiDep_group \
     --name ArchiDep \
     --command-id RunShellScript \
     --scripts "find /etc/ssh -name '*.pub' -exec ssh-keygen -l -f {} \;"
After a while, it should print the response:
{
  "value": [
    {
      "code": "ProvisioningState/succeeded",
      "displayStatus": "Provisioning succeeded",
      "level": "Info",
      "message": "Enable succeeded: \n[stdout]\n256 SHA256:IKNmtqj1OKCP4gyErlaQkBbn26gB0ofV3fLkw14yokg root@ArchiDep (ED25519)\n3072 SHA256:RGxd9jZfWrUUynsVNGmngD78AaZGcQNT4iHjwX6cK2c root@ArchiDep (RSA)\n256 SHA256:0TORCgUgzrPGeDHzV5fGAarkpGpc5Nbkhb7q2dbG0OA root@ArchiDep (ECDSA)\n\n[stderr]\n",
      "time": null
    }
  ]
}
Your machine’s public key fingerprints are in the message property, separated
by encoded new lines (\n).
Once you have them, there are two ways to check the key when the warning
appears. You can compare the fingerprint in the warning with these ones by eye:
in this example, the SHA256:0TORCgUgzrPGeDHzV5fGAarkpGpc5Nbkhb7q2dbG0OA the
warning shows is the machine’s ECDSA key. Or, instead of answering yes, you
can paste the matching fingerprint (the full SHA256:... value) at the prompt.
Your SSH client then compares it with the fingerprint the server sent, and only
connects if they are the same.
You can skip this step if you consider the risk and impact of an attack low enough. Understand that if you simply answer “yes” when the SSH client warns you, you are exposing yourself to a potential man-in-the-middle attack. In all likelihood, no one is trying to hack your Azure virtual machine for this course, but the possibility exists.
Since you are using public key authentication and not password authentication, your credentials should not be compromised (you will not send a password and your private key will not leave your computer). However, anything you do on that server could potentially be read and modified by an attacker if he manages to intercept the initial connection.
Configure your virtual server
You will now connect to your Azure virtual machine and configure some things for purposes of the course.
Connect to your new virtual machine over SSH
Connect to your virtual machine using the ssh <username>@<host> command,
replacing <username> with the username you chose for the course (the one you
used for the machine’s administrator account), and <host> with the IP address
you copied from the virtual machine’s information.
$> ssh jde@87.65.43.210
You should be able to connect without a password. This works because
you gave your public SSH key to Azure when creating your virtual server. It
was automatically put in your user’s ~/.ssh/authorized_keys file when the
server was launched, which allows you to authenticate using your private SSH
key.
Give the teacher access to your virtual machine
Once you are connected, run the following command to give the teacher access to your virtual machine (be sure to copy the whole line):
$> echo "ssh-ed25519 AAAAC3NzaC1lZDI1NTE5AAAAIOvqijz9czJd80ujna0JsLPkxi7X0EKuPrK7vebg7oJk archidep" | sudo tee --append "$HOME/.ssh/authorized_keys"
This adds the teacher’s public SSH key to your user’s ~/.ssh/authorized_keys,
allowing the teachers to also authenticate to your virtual server with their
private SSH key to help debug issues.
Change the hostname of your virtual machine
Configure the hostname for your virtual machine. You have chosen a username
(e.g. jde) and have been assigned a domain for the course (e.g.
archidep2.ch). Use a combination of both as the hostname for your server.
TipFor example, if your usename is jde and your assigned domain is
archidep2.ch, your hostname should be jde.archidep2.ch. Make sure not to
pick the same username/domain combination as someone else in the class.
$> sudo hostname jde.archidep2.ch
Also save your new hostname to the /etc/hostname file so that it will persist
when you reboot the server:
$> echo "jde.archidep2.ch" | sudo tee /etc/hostname
The hostname is the name of your virtual server. It can be any URL. It often
identifies a machine in an organization with the format
<machine-name>.<organization>.<tld> (e.g. unix-box.google.com).
For the purposes of this course, we will be using prepared domains such as
archidep2.ch, so it makes sense to use a subdomain corresponding to yourself
(jde.archidep2.ch) as the hostname.
Reboot the server
$> sudo reboot
Once the server has restarted (it might take a couple of minutes), check that you can still connect:
$> ssh jde@87.65.43.210
Welcome to Ubuntu 26.04 LTS
...
Also check that your hostname is correct:
$> hostname
jde.archidep2.ch
Add swap space to your virtual server
The cloud servers used in this course do not have enough memory (RAM) to run/compile many things at once. But you can easily add swap space to solve this issue.
Swap space in Linux is used when there is no more available physical memory (RAM). If the system needs more memory resources and the RAM is full, inactive pages in memory are moved to the swap space (on disk).
Adding 2 gigabytes of swap space should be enough for our purposes.
Run the following commands to make sure you disable any previous swap file you might have created during the exercises:
# (It's okay if this command produces an error.)
$> sudo swapoff /swapfile
$> sudo rm -f /swapfile
Use the following commands to create and mount a 2-gigabyte swap file:
$> sudo fallocate -l 2G /swapfile
$> sudo chmod 600 /swapfile
$> sudo mkswap /swapfile
Setting up swapspace version 1, size = 2 GiB (2147479552 bytes)
no label, UUID=3c263053-41cc-4757-0000-13de0644cf97
$> sudo swapon /swapfile
You can verify that the swap space is correctly mounted by displaying available
memory with the free -h command. You should see the Swap line indicating the
amount of swap space you have added:
$> free -h
              total        used        free      shared  buff/cache   available
Mem:          914Mi       404Mi       316Mi        31Mi       193Mi       331Mi
Swap:         2.0Gi       200Mi       1.8Gi
This swap space is temporary by default and will only last until your reboot your server. To make it permanent, you must tell your server to mount it on boot.
You can see the currently configured mounts with this command (the output may not be exactly the same):
$> cat /etc/fstab
# CLOUD_IMG: This file was created/modified by the Cloud Image build process
UUID=b1983cef-43a3-46ac-0000-b5e06a61c9fd       /        ext4   defaults,discard        0 1
UUID=0BC7-0000  /boot/efi       vfat    umask=0077      0 1
/dev/disk/cloud/azure_resource-part1    /mnt    auto    defaults,nofail,x-systemd.requires=cloud-init.service,comment=cloudconfig       0       2
BE VERY CAREFUL TO EXECUTE THE FOLLOWING COMMAND EXACTLY AS IS. Corrupting
your /etc/fstab file can prevent your server from rebooting.
To make the swap space permanent, execute the following command to add the
appropriate line to your server’s /etc/fstab file:
$> echo "/swapfile none swap sw 0 0" | sudo tee -a /etc/fstab
This line tells your server to mount the swap file you have created as swap
space on boot. You should see the new line at the end of the /etc/fstab file
if you display its contents again:
$> cat /etc/fstab
# CLOUD_IMG: This file was created/modified by the Cloud Image build process
UUID=b1983cef-43a3-46ac-0000-b5e06a61c9fd       /        ext4   defaults,discard        0 1
UUID=0BC7-08EF  /boot/efi       vfat    umask=0077      0 1
/dev/disk/cloud/azure_resource-part1    /mnt    auto    defaults,nofail,x-systemd.requires=cloud-init.service,comment=cloudconfig       0       2
/swapfile none swap sw 0 0
You can run the following command to check that you did not make any mistakes. It’s okay if you have a couple of warnings about the swap file. These are expected since you’ve just added it and have not rebooted yet.
$> sudo findmnt --verify --verbose
/
   [ ] target exists
   [ ] FS options: discard,commit=30,errors=remount-ro
   [ ] UUID=bf171e20-4158-4861-0000-1443ece8c413 translated to /dev/sda1
   [ ] source /dev/sda1 exists
   [ ] FS type is ext4
...
none
   [W] non-bind mount source /swapfile is a directory or regular file
   [ ] FS type is swap
   [W] your fstab has been modified, but systemd still uses the old version;
       use 'systemctl daemon-reload' to reload

0 parse errors, 0 errors, 2 warnings
IF everything looks ok, reboot your server:
$> sudo reboot
Reconnect to your server over SSH and run the free -h command again. The swap
space should still be enabled after reboot:
$> free -h
              total        used        free      shared  buff/cache   available
Mem:          914Mi       404Mi       316Mi        31Mi       193Mi       331Mi
Swap:         2.0Gi       200Mi       1.8Gi
You can also see the currently available swap space and how much is used with
the htop command which shows it as the Swp bar at the top (you can quit it
with q once it is open). For more information, see the fstab Linux
manpage.
Register your Azure VM with us
Make a note of your virtual server’s public IP address (the same IP address you
used to connect to it with the ssh command).
Also run the following command while connected to your server with SSH to print your server’s SSH host public keys:
$> cat /etc/ssh/ssh_host_*_key.pub
It should print one line per key, similar to this:
ecdsa-sha2-nistp256 AAAAE2VjZHNhLXNoYTItbmlzdHAyNTYAAAAIbmlzdHAyNTYAAABBBLw7...= root@ArchiDep
ssh-ed25519 AAAAC3NzaC1lZDI1NTE5AAAAIJDLOpPWR7r89VjK9kPMhsuqERGVbUi5RZnBlccQnt4e root@ArchiDep
ssh-rsa AAAAB3NzaC1yc2EAAAADAQABAAABgQDL6EKznX0xg652E/oWppt3TBYTZlArXmjx6Qs3UOzE...= root@ArchiDep
Copy all of these lines. Just one more step, go back to the dashboard, and paste them into the SSH host public keys field when you register your server:
Register your virtual server
When connecting to your server, we will check that the SSH host key it presents is one of the public keys you gave us. This makes sure we are connecting to your server and not an attacker’s (man-in-the-middle).
The files in the /etc/ssh directory whose names match ssh_host_*_key.pub are
the public SSH host keys of your server, i.e. the keys it uses to sign the
Diffie-Hellman key exchange parameters when an SSH secure tunnel is established.
Your shell replaces the * wildcard with whatever matches in each file name
(ecdsa, ed25519 and rsa), and the cat command prints the contents of all
matching files one after the other.
Each of these public keys has a matching private key in the same directory, in
the file with the same name without the .pub extension. It is safe to share a
public key, but never share a private key: anyone who has it can pretend to
be your server.
Save typing with an SSH configuration file
You will connect to your server many times during this course. Instead of typing
its username and IP address every time, you can give it a short name in your
SSH client’s configuration file, ~/.ssh/config, on your local machine.
Create or edit that file (for example with nano ~/.ssh/config) and add the
following lines, replacing the IP address with your server’s and the username
with yours:
Host archidep
  HostName 87.65.43.210
  User jde
You can now use archidep instead of your username and IP address with all
SSH-based commands:
$> ssh archidep
$> scp hello.txt archidep:
The exercises in this course will keep showing the full form with a username and
an IP address. You can use archidep instead wherever you see it. If you delete
your server and create a new one, it will probably have a new IP address:
remember to update the HostName line in your configuration file. Also note
that not all SFTP applications read this file. If yours does not, keep using
your server’s IP address and your username in the application.
More informationThe configuration file has many other options, for example Port to connect to
a non-standard port, or IdentityFile to use a private key that does not have
the default name. See the ssh_config documentation.
What have I done?
You have used a popular Infrastructure-as-a-Service (IaaS) cloud service (Microsoft Azure) to set up a virtual machine for your own use. You are renting this virtual machine for a monthly fee (using your free education credits).
You have used what you have learned about the command line and SSH to connect to this virtual machine and perform some basic setup steps in preparation for future deployment exercises.
Troubleshooting
Here’s a few tips about some problems you may encounter during this exercise.
I forgot to open some (or all) of the ports in the firewall
If you did not open the correct ports (80, 443, 3000 and 3001) during the initial configuration of your virtual server, you can go back to its network settings at any time and add the missing rules.
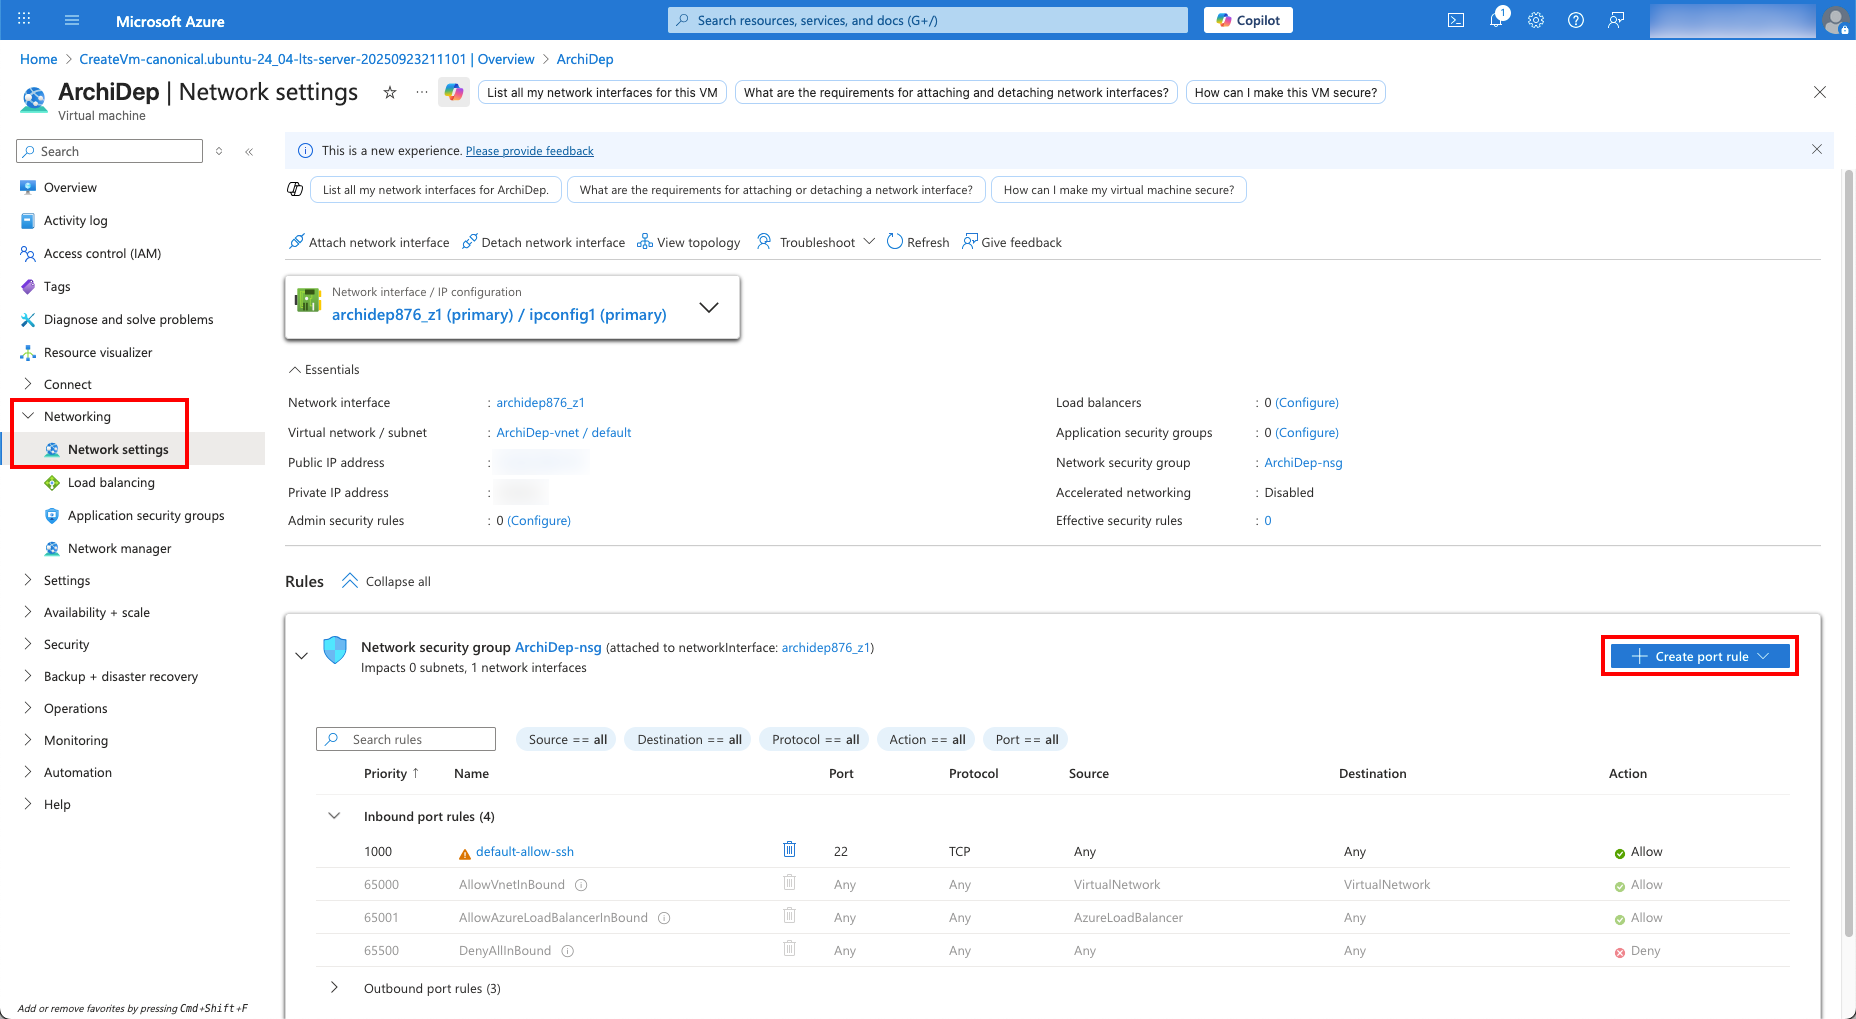
As a reminder, you need to add inbound rules to open the following ports (if you haven’t already):
- Service: HTTP, Action: Allow, Name: HTTP
- Service: HTTPS, Action: Allow, Name: HTTPS
- Service: Custom, Destination port ranges: 3000, Protocol: TCP, Action: Allow, Name: Port3000
- Service: Custom, Destination port ranges: 3001, Protocol: TCP, Action: Allow, Name: Port3001
Azure complains that my RSA key is too short
Azure requires that SSH keys of type RSA have at least 2048 bits. If your existing key is not accepted by Azure when pasting it in the administrator account settings of your virtual server later, you may need to generate a new one with enough bits:
ssh-keygen -m PEM -t rsa -b 4096
ATTENTION! If you already have an RSA key, this command will ask you if you want to overwrite it with the new one. If you do, the old key will be PERMANENTLY LOST. (You will need to put your public key on GitHub again and everywhere else you may have used it.)